Mastering 3D Design: Explore Rhino Grasshopper Tutorials
Introduction: Revolutionize Your Design Process with Rhino Grasshopper
Rhino Grasshopper is a game-changer in 3D modeling and design. This visual programming tool reshapes how designers approach parametric and algorithmic design. By setting rules and parameters, Grasshopper automates adjustments, freeing designers from manual tasks.
Key Features of Rhino Grasshopper:
- User-Friendly Interface: Ideal for those without deep coding knowledge, Grasshopper’s interface lets designers script 3D models visually, with immediate updates for every parameter change.
- Parametric and Algorithmic Design: Simplify complex design workflows. Grasshopper is essential for creating intricate structures and forms, impossible to achieve manually.
- Bridging Software and Hardware: Directly transfer parametric designs to production machinery, seamlessly linking computational design with digital fabrication.
Advantages in Various Industries:
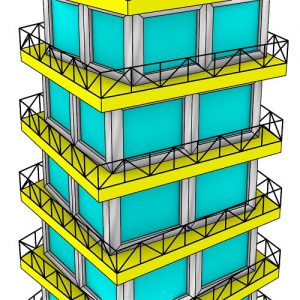
- Architecture and Engineering: Grasshopper is pivotal for designing optimized buildings, dynamic facades, and responsive structures.
- Industrial Design: From jewelry to furniture and packaging, Grasshopper aids in creating functional yet aesthetically appealing designs.
- Art: Artists employ Grasshopper to create unique sculptures, paintings, and animations, pushing the boundaries of traditional art forms.
Why Choose Grasshopper 3D?
- Visual Programming: Drag-and-drop components to design complex structures effortlessly.
- Parametric Design Experimentation: Explore a multitude of design possibilities and optimize effortlessly.
- Interactive Visualization: Instantly see the impact of your design changes, enabling swift iterations.
Grasshopper 3D is more than a tool for architects; it’s a comprehensive platform for designers, artists, and hobbyists to innovate and interact with the digital design world.
Rhino Grasshopper’s capabilities
Rhino Grasshopper offers a range of capabilities that make it a powerful tool for architects, designers, and engineers. Here are some of its key features:
- Algorithmic Modeling: Grasshopper allows users to create complex models by defining a series of algorithmic steps, enabling a level of precision and control that is difficult to achieve with traditional modeling techniques.
- Parametric Design: One of the most powerful aspects of Grasshopper is its ability to facilitate parametric design. This means that you can define certain parameters (like dimensions, angles, and distances) and Grasshopper will automatically adjust the model when these parameters change.
- Customizable Components: Grasshopper offers a wide range of pre-built components for tasks like creating geometries, modifying shapes, and controlling data. Users can also create their custom components.
- Interactive and Dynamic Modeling: Models in Grasshopper are interactive and update in real time as you change parameters, providing immediate visual feedback.
- Integration with Rhino: Grasshopper is tightly integrated with Rhino, meaning that models created in Grasshopper can be easily used and manipulated in Rhino.
- Data Visualization and Analysis: Grasshopper can be used for data visualization and analysis, which is particularly useful in fields like environmental analysis and structural optimization.
- Extensibility through Plugins: There are numerous plugins available for Grasshopper, expanding its functionality to include things like environmental analysis, structural analysis, and advanced geometry operations.
- Collaboration and Sharing: Grasshopper’s file format allows for easy sharing of scripts, making collaboration easier among team members or in educational settings.
- User Community and Resources: There is a strong community of Grasshopper users who share tutorials, scripts, and advice, making it easier for newcomers to learn and for professionals to expand their skills.
These capabilities make Grasshopper a versatile tool for anyone working in 3D modeling, design, and engineering, providing a platform for creating complex, parametrically controlled models and designs.
Rhino Grasshopper components and canvas
Rhino Grasshopper’s user interface mainly revolves around the canvas and its components, which are crucial for creating and manipulating algorithmic designs.
Canvas
The Grasshopper canvas is the primary workspace where you create and edit your algorithmic models. It’s a visual programming environment where you drag and drop components and connect them with wires to define relationships and flows of data.
- Intuitive Layout: The canvas is designed to be intuitive, allowing users to visually map out their designs and logic.
- Zoom and Pan: You can easily zoom in and out or pan across the canvas, which is helpful when working with complex models.
- Wire Connections: The wires show data flow between components. These connections are what drive the parametric relationships in your design.
Components
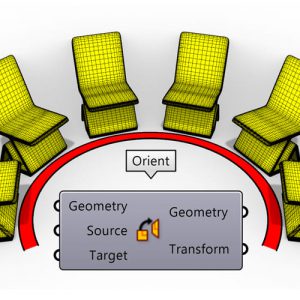
Components are the building blocks of Grasshopper scripts. Each component performs a specific function, from creating basic geometry to complex mathematical operations.
- Categories: Components are organized into various categories like ‘Params’, ‘Math’, ‘Sets’, ‘Vector’, ‘Curve’, etc., each serving different functions.
- Input and Output: Components have inputs (on the left) and outputs (on the right). You connect the output of one component to the input of another to create a flow of data.
- Color-Coded: Components are color-coded based on their category, making it easier to navigate and understand your script.
- Customizable: You can adjust the parameters within each component to change how they behave.
Typical Workflow on the Canvas
- Adding Components: You start by dragging components from the toolbar onto the canvas.
- Connecting Components: By drawing wires between components, you define the flow of data and relationships between different parts of your model.
- Adjusting Parameters: Double-clicking on a component allows you to adjust its parameters, thereby altering its behavior and the outcome of the connected components.
- Previewing Results: As you build and connect components, the results are dynamically updated and previewed in the Rhino viewport.
- Organizing the Canvas: For complex scripts, you can group components and label them for better organization and readability.
Tips for Using Grasshopper Canvas
- Understand the Data Tree Structure: Grasshopper handles data in a tree structure, which can be complex but offers powerful ways to manage and manipulate data.
- Use Groups and Comments: Group-related components and add comments to make your script more understandable.
- Experiment with Different Components: There’s a wide range of components available, and experimenting with them is key to understanding their potential.
Grasshopper’s visual programming approach on its canvas, combined with its rich array of components, makes it a flexible and powerful tool for architects, designers, and engineers to explore parametric and algorithmic design.
Conclusion: Embrace the Future of 3D Modeling with Rhino Grasshopper
Join the revolution in digital design. Rhino Grasshopper isn’t just a step forward in 3D modeling; it’s a leap into a future where design is dynamic, responsive, and constantly evolving. Dive into our latest Rhino Grasshopper tutorials and unleash the full potential of your creative skills.